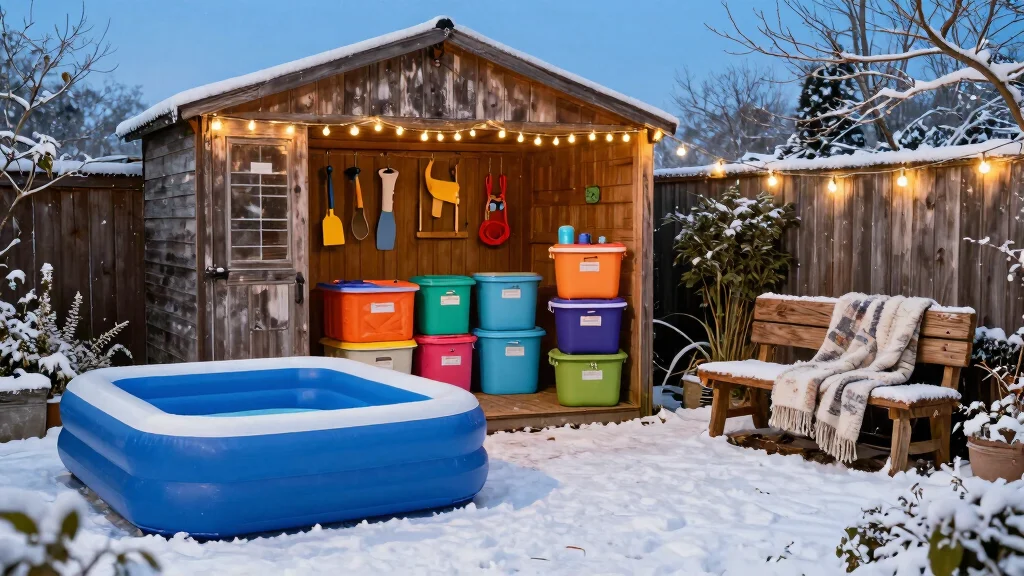
As the temperatures drop and winter creeps in, many inflatable pool owners find themselves facing the inevitable task of storing their pools for the season. This time of year always reminds me of the joy of summer days spent splashing around, but it also brings the realization that those sunny moments are on hold. If you’re someone who loves to keep your outdoor spaces tidy and organized, this post is for you.
I put this together because I know that figuring out how to store your inflatable pool can be a hassle. You want to protect your investment and maximize your outdoor space, right? That’s why I pulled together 11 clever inflatable pool storage ideas that are practical, creative, and perfect for keeping your garden organized during the colder months. Whether you have a small yard or plenty of outdoor space, you’ll find actionable tips that will make winter pool care easier and more efficient.
From utilizing collapsible storage bins to repurposing old furniture, these ideas will help you tackle your seasonal outdoor storage challenges. Get ready to embrace winter with a plan that not only protects your inflatable pool but also enhances the overall look of your garden space until summer returns.
Key Takeaways
– Protect Your Investment: Proper storage is crucial for maintaining the integrity of your inflatable pool during winter months.
– Creative Solutions: Use collapsible storage bins or repurpose old furniture to create efficient storage options that fit your space.
– Maximize Space: Consider under-deck storage or using a garden shed to keep your pool items organized and out of the way.
– Regular Maintenance Checks: Performing maintenance checks during storage can prevent damage and ensure your pool is ready for use when summer returns.
– Seasonal Organization: Creating a dedicated seasonal storage corner in your garden can simplify both storage and access to your pool items when warmer weather arrives.
1. Use Collapsible Storage Bins

Collapsible storage bins offer a practical way to keep your pool area organized during winter. These bins fold up easily when not in use and can accommodate a variety of pool accessories, from floats to cleaning supplies. You’ll appreciate how they simplify finding everything you need come summer, all while being visually appealing in your space.
To get the most out of your collapsible bins, select water-resistant options to protect your items. Clearly label each bin for fast identification, and consider stacking them in a shed or garage to save space.
Key steps for effective bin use:
– Choose durable, water-resistant materials
– Clearly label bins for easy access
– Stack bins to maximize vertical space
These bins not only keep your area clutter-free but also make your transition to summer seamless.
2. Hanging Storage Racks

Utilizing hanging storage racks is a smart way to maximize vertical space and keep your pool tools organized. By mounting these racks on the wall, you can easily access items like nets and brushes while clearing up floor space. This method enhances your outdoor organization and adds a decorative touch.
For effective use of hanging racks, pick sturdy options that can hold heavier tools. Install them at a height that suits your needs, and group similar items together for quick retrieval.
Helpful tips for hanging racks:
– Select racks strong enough for heavier tools
– Install at a convenient height for easy reach
– Group similar items for better organization
With a bit of creativity, hanging racks can also beautify your garden space, turning storage into an attractive feature.
❝DIY tip you’ll love: hanging storage racks turn cluttered sheds into calm, practical spaces. With inflatable pool storage ideas like sturdy wall racks, you grab nets and brushes in seconds and never trip over tools again.❞
3. Repurpose Old Furniture

Transforming old furniture into storage solutions is a unique way to store your inflatable pool items. For instance, a vintage dresser can serve as a charming storage chest for floats and toys, adding character to your garden while providing ample storage.
When repurposing furniture, take the time to sand and paint it for a fresh look. Apply weatherproof coatings to ensure durability, and consider adding decorative knobs for a personal touch.
Tips for repurposing old furniture:
– Sand and paint for a new appearance
– Protect with weatherproof coatings
– Personalize with unique knobs or handles
This method allows you to showcase your style while keeping your garden organized and functional.
How To Choose the Right Inflatable Pool Storage Solutions
Choosing the right storage solution for your inflatable pool during the winter months can help keep it in good shape. The right choice not only saves space but also prolongs the life of your pool. Here are some important factors to consider when selecting your storage options:
1. Size
When choosing storage solutions, consider the size of your inflatable pool. Measure its dimensions when deflated to ensure you pick a storage option that fits comfortably. This will prevent unnecessary stress on the material and ensure easy access when you need to set it up again. Aim for bins or racks that are slightly larger than your pool to allow for ease of handling.
2. Material
The material of your storage container is crucial for protecting your pool from moisture and pests. Look for containers made from durable, weather-resistant materials like heavy-duty plastic. If using fabric bags or covers, ensure they are breathable to prevent mold growth. A moisture-resistant lining can add an extra layer of protection, especially in damp winter months.
3. Features
Consider the features of the storage solution. Options like collapsible bins or bags with handles can make transportation easier. Some storage solutions even come with ventilation to reduce moisture buildup. If you have limited space, opt for stackable containers or storage racks, which can help keep your area organized without taking up too much room.
4. Accessibility
Make sure your chosen storage solution allows for easy access to your inflatable pool and its accessories. You want to be able to grab everything quickly when spring rolls around. Choose containers that open wide or have easy access points. If you have multiple pools or toys, labeling each container can be a great way to streamline your setup process.
5. Budget
Lastly, consider your budget. Storage solutions can vary widely in price. Set a budget before you start shopping and try to stick to it. You can find affordable options at local stores or online. Remember, investing a little more in a quality storage solution can save you money in the long run by prolonging the life of your inflatable pool.
Pro Tip: When selecting storage solutions, think about combining options. For example, use a weatherproof container for the pool and a separate, smaller bag for accessories. This can help keep everything organized and make it easy to store and retrieve when needed!
4. Under Deck Storage

If your pool sits under a deck, this space can be cleverly utilized for storage. Creating a hidden area for your inflatable pool items keeps them protected and out of sight, making your outdoor space look neat and tidy.
For effective under-deck storage, use weather-resistant bins to shield your items. Consider installing shelves or hooks for better organization and ensure to keep the area tidy with regular checks.
Ideas for effective under-deck storage:
– Utilize weather-resistant bins for protection
– Install shelves or hooks for organization
– Regularly clean and check the area
This method not only conceals your supplies but also safeguards them from harsh winter weather.
5. Use a Garden Shed

Investing in a garden shed is an excellent long-term strategy for inflatable pool storage. These structures provide ample room for all your pool supplies and gardening tools, ensuring everything is conveniently located and shielded from winter’s elements.
When choosing a shed, look for one with good ventilation to prevent mildew. It should be spacious enough for your needs, and adding shelving can help with organization.
Key considerations for selecting a garden shed:
– Ensure good ventilation to avoid mildew
– Choose a size that accommodates all items
– Consider adding shelves for better organization
This dedicated storage space keeps your inflatable pool in great condition, ready for warm days ahead.
6. Use a Tarp or Cover

Using a tarp or cover is a straightforward yet effective way to protect your inflatable pool during winter. This layer safeguards against snow and moisture, helping maintain the integrity of your pool.
For optimal results with a tarp, opt for a heavy-duty version and secure it tightly to withstand wind. Ensure the pool is clean and dry before covering it to prevent mildew buildup.
Tips for effective tarp use:
– Choose a heavy-duty material for durability
– Secure tightly to prevent lifting by wind
– Ensure pool is clean and dry before covering
This economical solution not only protects your pool but also helps you save money on repairs come summer.
7. Floating Shelves

Floating shelves offer a stylish way to store smaller pool items without taking up floor space. These can be mounted on any wall in your garden or storage area, keeping everything organized and visually appealing.
When installing floating shelves, consider their decorative quality as well as functionality. They are perfect for displaying pool care products or small garden decorations and can be customized to fit your style.
Benefits of using floating shelves:
– Add a decorative touch while being functional
– Showcase pool care products or decor items
– Easy to install and customize as needed
Choosing colors and styles that match your garden will make storage an attractive part of your outdoor design.
Fun fact: Floating shelves save up to 40% of floor space, turning tight garden corners into clever spots for inflatable pool storage ideas. With style and practicality, they display pool care products while keeping the area neat.
8. Create a Seasonal Storage Corner

Designating a corner in your garden for seasonal storage can be both practical and aesthetically pleasing. This area can be tailored specifically for your inflatable pool equipment, adding charm to your winter landscape.
To create an appealing storage corner, combine bins and racks for efficiency, and consider decorating with winter-themed items to enhance the look. Make sure to keep essential tools easily accessible for winter maintenance tasks.
How to set up a seasonal storage corner:
– Combine bins and racks for effective use
– Decorate with seasonal items for added charm
– Maintain easy access to tools for winter care
This approach keeps everything together while also adding a cozy atmosphere to your garden.
9. Use Old Totes or Bags

Old totes or bags can be repurposed into effective storage solutions for your inflatable pool accessories. These items are perfect for holding smaller items like goggles, pool toys, or cleaning supplies while adding a personal touch to your storage.
Using bags offers several benefits, such as being lightweight and easy to carry. Many bags are already water-resistant, which helps protect your items, and you can easily label or decorate them to fit your garden’s theme.
Advantages of using bags:
– Lightweight and portable for easy use
– Often water-resistant to keep items safe
– Customize with labels or decorations for style
This budget-friendly option not only organizes your items but also adds character to your winter setup.
10. Use PVC Pipe Racks

PVC pipes can be creatively transformed into functional storage solutions for your inflatable pool maintenance tools. Constructing vertical racks or horizontal holders keeps everything organized and easily accessible.
One major advantage of PVC racks is their weather resistance, ensuring your tools remain in good condition. They can be customized to fit your specific storage needs and are both affordable and easy to assemble.
Benefits of PVC racks:
– Weather resistant for long-lasting use
– Customizable to suit your storage requirements
– Inexpensive and simple to build
This DIY project not only organizes your tools but showcases your creativity in your garden.
Fun fact: PVC pipe racks can cut tool clutter by up to 60% and cost under $25 to build. For winter inflatable pool storage ideas, a vertical rack keeps maintenance tools organized and easily accessible through the season.
11. Regular Maintenance Checks

Conducting regular maintenance checks during winter is crucial for preserving your inflatable pool. Keeping an eye on your pool while stored helps prevent damage and ensures it’s ready when warmer weather returns.
To maintain your pool, inspect for leaks or damage every few weeks, clean the surface to avoid mildew, and store chemicals safely and dry. These simple steps will streamline your seasonal storage and prolong the life of your inflatable pool.
Maintenance strategies to consider:
– Inspect for leaks or damage regularly
– Clean surfaces to prevent mildew buildup
– Store chemicals safely in a dry area
By staying proactive with maintenance, you can enjoy a hassle-free pool experience when summer arrives.
Conclusion

With these 11 clever inflatable pool storage ideas, winter can be a season of organization rather than chaos for pool owners. From creative repurposing to clever maintenance tips, you can keep your outdoor space tidy and ready for the next summer adventure.
Don’t let winter hold you back; start organizing today and ensure your inflatable pool is in top shape for sunny days ahead!
Note: We aim to provide accurate product links, but some may occasionally expire or become unavailable. If this happens, please search directly on Amazon for the product or a suitable alternative.
This post contains Amazon affiliate links, meaning we may earn a small commission if you purchase through our links, at no extra cost to you.
Frequently Asked Questions
What are the most practical inflatable pool storage ideas for winter months?
Here are practical inflatable pool storage ideas to protect your pool during winter months. Start with a thorough clean and let it dry completely to prevent mold and mildew.
Deflate the pool fully and fold it carefully, using the original box or a breathable storage bag to avoid moisture buildup. Store in a cool, dry place away from extreme temperatures and direct sunlight. Add a desiccant pack inside the storage bag and seal it to keep humidity down. Label bins for easy access next season and consider a labeled, weatherproof container for seasonal outdoor storage. These steps are simple, effective winter pool storage practices and align with smart garden organization tips.
How can I plan winter pool storage to protect my inflatable pool during cold months?
Plan first by measuring your storage space and mapping where the pool will live in winter. Choose a dry, sheltered spot and keep it away from freezing temperatures if possible. Before storing, perform inflatable pool maintenance steps: rinse, sanitize, dry, and inspect for leaks.
Disassemble and store accessories (patch kit, pump, hoses) in labeled containers. Use sealable totes to keep dirt out and prevent pests. A tidy, labeled setup reduces springtime setup time and keeps your equipment in good condition—perfect seasonal outdoor storage practice.
What maintenance tasks are essential for inflatable pools in winter and how do they affect storage?
Key inflatable pool maintenance tasks in winter include draining according to manufacturer guidelines, drying thoroughly, and checking seams for wear. Patching small leaks now saves bigger headaches later and makes storage easier because you’re not storing pre-existing damage.
Clean and disinfect surfaces, then store with a protective cover or inside a breathable tote to keep dust out without trapping moisture. Proper maintenance reduces risk of mold, and ensures a smooth transition back to use when warmer weather returns.
Which seasonal outdoor storage tips help keep an inflatable pool organized and ready for spring?
Use clear, labeled storage bins so you can see what’s inside without opening them. Keep hoses, pumps, and patch kits in separate, organized containers. Consider wall-mounted hooks or a tall shelf in a garage or shed for vertical storage, freeing up floor space for garden supplies. Add garden organization tips like a dedicated winter kit with all essentials to streamline setup in spring.
How can I care for an inflatable pool during winter to prevent damage and simplify storage?
The goal is to prevent freezing damage and moisture buildup. Use a lockable lid or cover during winter to keep debris out and reduce sun exposure—another seasonal outdoor storage safeguard. Fully deflate, fold neatly, and store in a breathable bag or container. Keep the area cool, dry, and away from rodents. Doing these steps makes pool care during winter easier and sets you up for a quick restart when the season returns.
![9 Essential Compost Bin Maintenance Tips [No Bad Smells]](https://huserie.com/wp-content/uploads/2026/04/9-Essential-Compost-Bin-Maintenance-Tips-No-Bad-Smells-150x150.webp)

![15 Stunning Inflatable Pool Deck Ideas [Make It Look Built In]](https://huserie.com/wp-content/uploads/2026/04/15-Stunning-Inflatable-Pool-Deck-Ideas-Make-It-Look-Built-In-150x150.webp)