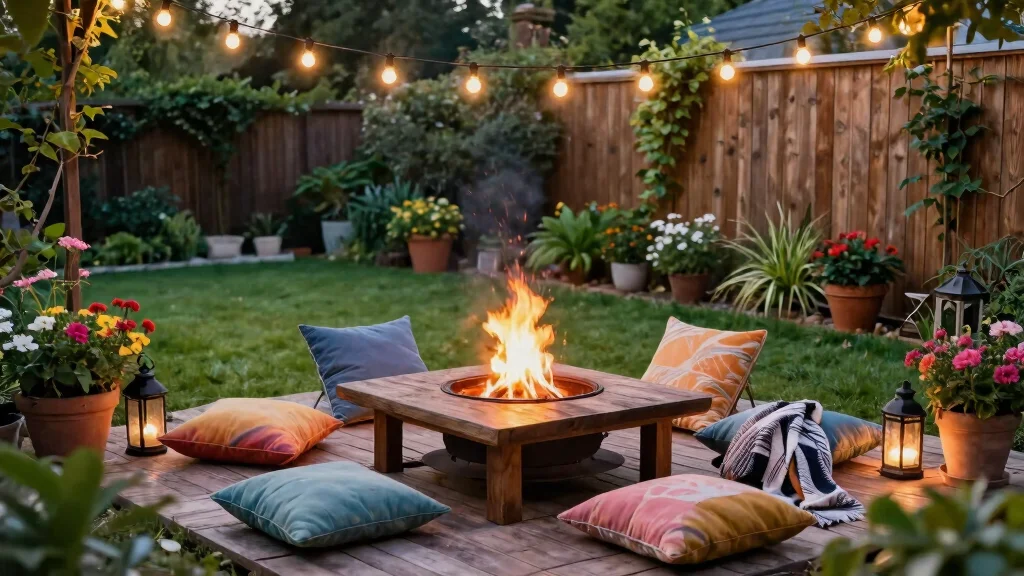
Creating a cozy atmosphere on your patio or balcony can sometimes feel like an art form, especially when space is limited. If you’ve been searching for that perfect touch to elevate your outdoor decor, I’ve got you covered. This post is all about DIY table top fire pits that bring warmth and charm without burning a hole in your wallet.
If you love home improvement projects or enjoy spending time outdoors, these ideas are tailor-made for you. There’s something uniquely satisfying about crafting your own fire pit, and these projects are not just easy; they also let you express your style while enjoying nights under the stars. Imagine gathering with friends, roasting marshmallows, or simply enjoying the ambiance as you unwind after a long day.
In this guide, you’ll find 11 budget-friendly DIY table top fire pit projects that are perfect for small spaces. Each project comes with simple instructions and creative ideas, so you can easily create a beautiful centerpiece for your patio. Whether you’re a seasoned DIY enthusiast or just looking for a fun weekend project, you’re sure to find something that sparks your interest.
Key Takeaways
– Discover 11 unique DIY table top fire pit projects that fit any budget and style.
– Each project is designed to be simple and perfect for small spaces, making them ideal for patios or balconies.
– You’ll learn how to use everyday materials, including terracotta pots and concrete blocks, to create functional decor.
– These fire pits not only enhance outdoor decor but also provide a warm gathering spot for friends and family.
– Get inspired to personalize each project, making your outdoor area a true reflection of your taste and lifestyle.
1. Terracotta Pot Fire Pit
 1")
Looking for a charming addition to your outdoor space? A terracotta pot fire pit might be just what you need! With a larger pot as the base and a smaller one inverted on top, you can create a beautiful centerpiece that draws the eye. Gather some gravel, fire glass, and a small burner to get started. Simply fill the larger pot with gravel for stability, place the burner inside, and finish with fire glass for a sparkling touch.
Not only does this project enhance your patio, but it also fits nicely within a budget. Just remember to prioritize safety with proper ventilation. Here are a few tips to ensure success:
– Ensure the burner fits well with your pot’s size.
– Try different colored fire glass for unique looks.
– Add candles around the base for a warm glow.
Let your creativity shine and transform your outdoor area into a cozy retreat!
2. Concrete Block Fire Pit
 2")
Want a fire pit that combines strength with style? A concrete block fire pit is an excellent choice! This sturdy design uses concrete blocks, a fire pit ring, and gravel for a durable outcome. Arrange the blocks in a circle, fill the bottom with gravel, and place the fire pit ring in the center. Top it off with fire glass or stones for an attractive finish.
The versatility of this design is a major perk; you can adjust its height and shape to fit your space. To maximize your fire pit’s potential, consider these ideas:
– Stack blocks in creative patterns for a custom look.
– Paint the blocks to match your outdoor style.
– Use outer blocks for seating with added cushions.
This fire pit will serve as a gathering spot, bringing friends and family together around its warm glow.
3. Glass Bowl Fire Pit
 3")
Ready to elevate your outdoor ambiance? A glass bowl fire pit is a chic solution! This stunning project can double as a decorative centerpiece. Start by placing a fire bowl on a sturdy surface and filling the bottom with decorative stones. Pour fire gel as instructed, ignite it, and watch the flames dance beautifully within the glass!
This design is compact, making it ideal for smaller patios or balconies. Here are some suggestions to enhance your setup:
– Use colored stones for a stylish effect.
– Surround the bowl with seasonal flowers for vibrancy.
– Ensure the bowl is heat-resistant for safety.
Impress your guests with this glamorous fire pit that adds charm to your outdoor experience.
4. Vintage Metal Bucket Fire Pit
 4")
Looking for rustic charm? Upcycling a vintage metal bucket into a fire pit is a delightful project! These buckets are often found at thrift stores, making it both affordable and eco-friendly. Simply drill holes for ventilation, fill it with gravel, and place a small burner inside. Add some heat-resistant paint or keep it vintage for a unique look.
The warm glow creates an inviting atmosphere, and this portable pit can easily move around your garden. Consider these ideas to enhance its functionality:
– Add handles for easy transport.
– Surround the base with decorative stones.
– Pair it with mismatched outdoor furniture for a relaxed vibe.
This fire pit serves as a great conversation starter while adding a touch of personality to your outdoor space.
5. Wooden Crate Fire Pit
 5")
Want to bring rustic beauty to your outdoor area? Transforming an old wooden crate into a fire pit is a simple yet charming DIY project! Start by stabilizing the crate and lining the bottom with fire-safe material. Place a small burner inside, surrounded by decorative stones or glass. The wooden crate offers a unique rustic touch that fits beautifully in many outdoor settings.
To enhance its charm, consider:
– Staining or painting the crate in your favorite colors.
– Using the top as a table for snacks when not in use.
– Adding cushions around it for extra comfort.
This DIY project is perfect for those who appreciate hands-on creativity and sustainable practices.
6. Steel Fire Pit Table
 6")
Looking for a modern touch? A steel fire pit table is a stylish and functional addition! Using a steel table or creating a frame, you can design a spacious fire pit that doubles as a coffee table. Place a burner inside, surround it with fire glass, and enjoy its contemporary charm. This setup is perfect for social gatherings, providing warmth and light.
To elevate your design, consider:
– Choosing a sleek finish for a modern aesthetic.
– Incorporating storage underneath for outdoor essentials.
– Designing the surface to serve as a snack area.
This fire pit table becomes a conversation piece while enhancing your outdoor decor.
7. Simple Mason Jar Fire Pit
 7")
Who knew mason jars could be so versatile? Turn large mason jars into delightful fire pits! Fill them with safe burning gel and place a wick inside for cozy lighting. Line several jars along a table or patio to create an inviting atmosphere.
Make this project even more engaging:
– Use different jar sizes for visual variety.
– Decorate with twine or paint to match your theme.
– Ensure proper ventilation for safety.
These mason jar fire pits add a personal touch and are budget-friendly, perfect for enhancing outdoor decor.
Difficulty Rating & Requirements
Overall Difficulty Rating: Medium
Creating a DIY table top fire pit can be a fun project, but it does require some basic skills and tools. This rating means it’s suitable for those with a little hands-on experience or a willingness to learn. If you’re comfortable with tools and have completed simple DIY projects before, you’ll find this enjoyable and rewarding.
Time Estimate:
⏱ Estimated time: 3-5 hours
Depending on the complexity of the fire pit you choose, the time can vary. Here’s a breakdown of the major phases:
1. Planning and Design: 1 hour – Determine which fire pit design suits your style and space.
2. Gathering Materials: 1 hour – Collect all necessary items before starting.
3. Construction: 1-3 hours – Build the fire pit according to your chosen design. This can take longer for more intricate designs.
Skill Requirements:
– Required skills: Basic woodworking, measuring, mixing cement, or simple assembly.
– Beginner-friendly: Yes! With basic skills and some guidance, beginners can tackle these projects. Most essential techniques can be learned through online tutorials.
– Skills that can be learned: Measuring, cutting, and basic assembly. Skills requiring experience include welding or advanced carpentry, depending on the project.
Tools & Materials Needed:
🧰 Essential items checklist:
1. Power drill – Required for making holes (especially for the terracotta pot).
2. Saw – Required if cutting wood or concrete blocks.
3. Mixing bucket – Required for mixing concrete (if using).
4. Fire-resistant adhesive – Required for securing materials.
5. Measuring tape – Required to ensure accurate dimensions.
6. Safety goggles – Required for eye protection.
7. Gloves – Required to protect your hands during construction.
8. Optional decorative items – Optional to personalize your fire pit.
Step-by-Step Overview:
The following phases will guide you through your DIY table top fire pit project:
1. Planning (1 hour): Decide on a design that fits your space and gather inspiration. Consider safety and the materials you want to use.
2. Gathering materials (1 hour): Make a checklist based on your design and visit local stores or online shops. Ensure you have everything on hand before starting.
3. Building (1-3 hours): Follow your design. Start with the base and work your way up. If you’re using concrete, mix it according to instructions.
4. Finishing touches (30 minutes): Add any decorations or safety features, like a wind guard or a heat-resistant surface.
Cost Comparison: Professional vs DIY: Hiring a professional to build a custom fire pit can range from $500 to $3000, depending on materials and complexity. In contrast, DIY costs can be as low as $50 to $200, making it a budget-friendly option. If you’re looking to save money and enjoy hands-on projects, this DIY route is a smart choice. However, if you’re not comfortable with tools or the building process, consider hiring help for safety and quality assurance.
8. Slate Tile Fire Pit
 8")
Want to create a unique fire pit? Use slate tiles for a stunning natural look! Start by arranging slate tiles in a circular pattern and securing them with fire adhesive. Fill the bottom with gravel and place your burner inside. The slate provides an earthy aesthetic that complements greenery beautifully.
Here are some suggestions to elevate your design:
– Mix different slate colors for creativity.
– Add benches with cushions for comfort.
– Surround the pit with low-maintenance plants for softness.
This design not only warms your space but also serves as an elegant centerpiece.
Fun fact: a 24-inch slate tile circle with a 3/4-inch layer of gravel creates a stable, heat-safe base for your diy table top fire pit that feels roomier in small spaces. Mix two or three slate colors for contrast, and you can elevate the look in under an hour.
9. Fire Pit Dinner Table
 9")
For a unique dining experience, consider building a fire pit that doubles as a dinner table! This project is perfect for outdoor dining lovers. Design a table with a built-in fire pit in the center using heat-resistant materials. Ensure there’s enough space for comfortable dining while enjoying the fire’s warmth.
Practical tips include:
– Making sure the table is spacious and safe.
– Using protective glass around the fire pit area.
– Decorating the tabletop with outdoor-friendly decor.
This design enhances your dining experience and makes a striking statement in your outdoor space.
Turn a small patio into a guests-ready dining space with a DIY table top fire pit. A built-in center fire pit lets you dine al fresco safely—just add heat-resistant glass and ample space for guests. Cozy, practical, and surprisingly doable in any backyard.
10. Upcycled Oil Drum Fire Pit
 10")
Turn an old oil drum into a stylish industrial fire pit for your backyard! This eco-friendly project offers a unique aesthetic. Clean the drum thoroughly and add ventilation holes. You can paint it to match your decor or keep it raw for a rustic appeal. Fill with gravel and place a burner inside before lighting up.
To enhance its look:
– Use the exterior for stencils or artwork.
– Set up seating around the drum for cozy gatherings.
– Pair it with industrial-style furniture for a cohesive vibe.
This fire pit will be a conversation starter and creatively reuse materials.
11. Minimalist Wire Fire Pit
 11")
For a design-savvy choice, consider a minimalist wire fire pit! This chic project uses a wire frame to create a modern look that showcases the flames. Craft a wire frame and insert a small burner in the center, surrounding it with heat-resistant stones or glass for beauty.
To make it stand out, think about:
– Keeping the design sleek with a monochromatic palette.
– Incorporating low-profile seating for an airy feel.
– Using decorative elements like plants around the base.
This fire pit adds warmth and elevates your patio’s aesthetic, making it a fun project for design enthusiasts.
Minimalist wire fire pits spark big style—compact, chic, and perfect for a diy table top fire pit on small spaces. Build a sleek wire frame with a small burner at the center, surround it with heat-resistant stones for a modern, monochrome upgrade.
Conclusion
 12")
These 11 DIY table top fire pit projects offer a fantastic way to enhance your outdoor space without breaking the bank.
Each design brings its own unique flair, allowing you to express your style while enjoying cozy evenings by the fire. Don’t hesitate to mix and match ideas or add personal touches to make these projects truly yours. Gather your materials and get started—you’ll be amazed at how a fire pit can transform your outdoor experience!
Note: We aim to provide accurate product links, but some may occasionally expire or become unavailable. If this happens, please search directly on Amazon for the product or a suitable alternative.
This post contains Amazon affiliate links, meaning we may earn a small commission if you purchase through our links, at no extra cost to you.
Frequently Asked Questions
What is a diy table top fire pit and is it suitable for small spaces?
A diy table top fire pit is a compact, table-ready fire feature designed to sit on a table or low surface to create warm ambiance without a full-size pit.
Perfect for small spaces like apartments, balconies, or tiny patios, it keeps your outdoor decor cozy without sacrificing floor space.
To get started, choose a shallow, heat-safe tray or burner, select a safe fuel such as ethanol or gel, and place a nonflammable surface beneath it. Use a windscreen or glass guard, and always follow local codes and manufacturer instructions for a diy table top fire pit.
What materials and safety considerations make a budget-friendly diy table top fire pit?
For budget-friendly builds, look for affordable, readily available parts: a shallow metal tray or baking pan, a small burner, tiles or stone veneer for a tabletop surface, fire glass or lava rock for aesthetics, and weatherproof sealant.
Safety matters: use a noncombustible base, keep at least a few feet from flammable items, use a fire-rated mat, and choose safe fuels such as gel or ethanol. Never leave burning fuel unattended and follow manufacturer safety guidelines.
How do I choose the best location and setup for a diy table top fire pit in a small patio?
Start by picking a stable, nonflammable surface away from overhangs. Keep at least 3–5 feet of clearance from walls, furniture, and planters. Check wind direction and avoid open flames in windy spots. Place the fire pit on a heat-resistant mat or tray, and ensure proper ventilation. Always verify local codes and consider outdoor decor consistency with your space.
Can I customize a diy table top fire pit to match my outdoor decor and patio projects?
Absolutely. You can tailor color, finish, and texture to fit your space. Use heat-safe tiles or stone veneer for a cohesive look, paint metal with outdoor-safe enamel, or add decorative glass beads. Pair with matching outdoor decor and patio projects like planters and lighting for a polished vibe. Just ensure the finishes are rated for exterior use and heat exposure.
What maintenance tips keep my diy table top fire pit safe and long-lasting?
Regularly wipe away spills and let any burner cool before refueling. Inspect for rust, cracks, or loose parts before each season. Clean the burner area and replace damaged components promptly. Use a weatherproof cover when not in use and store fuel according to the manufacturer’s directions. With these simple steps for budget gardening and home improvement projects, your diy table top fire pit stays safer and longer-lasting.
![9 Essential Compost Bin Maintenance Tips [No Bad Smells]](https://huserie.com/wp-content/uploads/2026/04/9-Essential-Compost-Bin-Maintenance-Tips-No-Bad-Smells-150x150.webp)

![15 Stunning Inflatable Pool Deck Ideas [Make It Look Built In]](https://huserie.com/wp-content/uploads/2026/04/15-Stunning-Inflatable-Pool-Deck-Ideas-Make-It-Look-Built-In-150x150.webp)