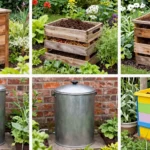
![13 Easy Rain Barrel Installation Ideas for Beginners [Pro Guide]](https://huserie.com/wp-content/uploads/2026/04/13-Easy-Rain-Barrel-Installation-Ideas-for-Beginners-Pro-Guide.webp)
Rainy days can often bring a sense of coziness, but they can also leave you feeling frustrated when all that precious water just washes away. This time of year has me thinking about effective ways to collect and use rainwater, which is why I created this post. If you’re into gardening and want to make the most of every drop, then this guide on rain barrel installation ideas is just for you. You’ll learn how simple and effective rainwater harvesting can be, especially for beginners looking to dive into eco-friendly gardening.
In this guide, I pulled together 13 easy rain barrel installation ideas that are practical, affordable, and perfect for small spaces or community gardens. Whether you’re a newbie trying to kickstart sustainable water solutions or a seasoned gardener wanting to expand your DIY gardening projects, you’ll find something to inspire you. From decorative planters to compact rain barrels, these ideas will help you save water while nurturing your plants. Get ready to learn how you can turn your rainy days into a resource for your garden!
Key Takeaways
– Gather valuable rainwater with simple rain barrel installations that enhance your gardening efforts while minimizing water waste.
– Explore various styles, such as decorative planters and hidden rain barrels, that can blend seamlessly into your urban garden.
– Discover how to set up a rain barrel with a drip irrigation system to ensure an efficient watering process for your plants.
– Learn the importance of using sustainable water solutions to promote eco-friendly gardening and reduce your environmental impact.
– Get tips on selecting the right rain barrel size and features for your space, whether you have a small balcony or a larger backyard garden.
1. Decorative Planter Rain Barrel

Imagine turning your rain barrel into a stunning decorative planter that complements your garden’s style. By wrapping it in materials like reclaimed wood, colorful tiles, or vibrant paint, you can create a unique piece that not only collects rainwater but also enhances your outdoor space. This idea is perfect for those who want functionality without compromising on aesthetics.
Begin by deciding on a style that resonates with you—whether it’s rustic, modern, or artistic. Prep the barrel’s surface if you’re using paint or tiles, and don’t forget to apply a waterproof sealant for longevity. Select drought-tolerant plants like succulents and colorful blooms to fill your barrel and create a beautiful display.
Key steps to create your decorative planter rain barrel:
– Choose a design that enhances your garden’s theme
– Prepare the barrel with a waterproof coating
– Select vibrant, drought-resistant plants
– Ensure the barrel is functional for rainwater collection
With this creative approach, you not only promote eco-friendly gardening but also showcase your personal style in your outdoor sanctuary.
2. Simple Downspout Diverter

A downspout diverter is one of the easiest ways to install a rain barrel. It channels rainwater directly from your gutters into the barrel, making it an efficient solution during storms. This method ensures that you’re effectively collecting water for those dryer days when your plants need it most.
Start by positioning your rain barrel beneath the downspout from your roof, ideally close to your garden. Choose a diverter that fits your downspout and follow the manufacturer’s guidelines for installation. Elevate your barrel on a sturdy base for better water pressure when using it for watering.
Steps to set up your downspout diverter:
– Position the barrel directly under your downspout
– Cut and attach the diverter as needed
– Elevate the barrel for optimal water flow
– Regularly clean the diverter to prevent clogs
This straightforward method not only saves you time but ensures you’re equipped with water for your plants when they need it most.
3. Vertical Garden Rain Barrel

For those with limited space, a vertical garden rain barrel offers an innovative solution. This setup allows you to collect rainwater while maximizing your available growing area by utilizing vertical space. It’s a perfect blend of functionality and creativity for urban gardeners.
Construct a sturdy vertical structure, such as a wooden frame or repurposed pallet, to support your barrel and plants. Select climbing plants like peas, tomatoes, or strawberries that thrive in vertical arrangements. Ensure the rain barrel is positioned to capture rainwater effectively, trickling down to nourish the plants below.
Key components of a vertical garden rain barrel:
– Build a robust structure for stability
– Choose plants that grow well vertically
– Ensure proper water flow from the barrel
– Decorate the setup to match your garden style
This unique combination enhances your garden’s beauty while making efficient use of limited space.
4. DIY Rain Barrel with a Faucet

Making your own rain barrel with a faucet is a fulfilling DIY project that provides easy access to collected rainwater. This setup simplifies watering your garden, making it more convenient and efficient.
Start with a clean plastic or wooden barrel, a faucet, and waterproof sealant. Drill a hole near the bottom of the barrel for the faucet, applying sealant around the hole to prevent leaks. Don’t forget to personalize your barrel with paint or decorations to fit your garden’s theme.
Steps to create your DIY rain barrel:
– Gather a clean barrel and the necessary tools
– Drill a hole and install the faucet securely
– Decorate the barrel to match your garden
– Use the faucet for easy watering access
This DIY project not only saves you money but also adds a personal touch to your gardening space.
Did you know? A basic rain barrel with a faucet can cut outdoor watering by up to 60% during peak season. With simple rain barrel installation ideas, you gain easy, on-demand watering for your urban garden—without the guesswork.
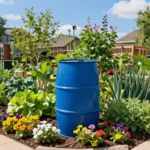
5. Compact Rain Barrel for Small Spaces

If you’re gardening in a small urban area, a compact rain barrel is an ideal solution for rainwater harvesting. These barrels occupy less space while still effectively collecting rainwater for your plants.
Select a barrel designed for small spaces, typically holding around 30-50 gallons. Position it under a downspout or on a small patio or balcony for convenience. Consider using a diverter to maximize collection from even the smallest rain showers.
Key features of a compact rain barrel:
– Choose a barrel size that fits your space
– Place it strategically for easy access
– Use a diverter for efficient collection
– Opt for decorative styles that blend with your garden
This approach allows you to practice sustainability without sacrificing valuable space.
6. Rain Barrel with a Rain Chain

Adding a rain chain to your rain barrel setup creates a charming and functional water collection system. Rain chains not only direct water flow but also enhance the visual appeal of your garden.
Select a rain chain design that suits your garden style, whether it’s a simple copper chain or an intricate handmade piece. Position the chain to funnel water directly into your rain barrel from your roof or gutters. This setup adds aesthetic value while creating soothing sounds as water flows down the chain.
Essentials for a rain barrel with a rain chain:
– Pick a rain chain that complements your garden
– Install it to direct water flow effectively
– Enjoy the calming sound of flowing water
– Regularly check for debris to maintain functionality
This combination of practicality and beauty elevates your rainwater collection experience.
Fun fact: a 6-foot rain chain can funnel 40–200 gallons into your rain barrel during a heavy shower. Pair it with the right gutters, and you’ll cut runoff, boost garden irrigation, and enjoy soothing water sounds every time it rains.
7. Hidden Rain Barrel

If you prefer to keep your rain barrel discreet, consider a hidden rain barrel solution. This approach allows you to integrate your rain barrel into your garden’s landscape seamlessly.
Choose a hiding spot behind shrubs, ornamental grasses, or within a decorative enclosure. Use lattice panels, garden art, or trellises with climbing plants to conceal the barrel. Just ensure you have easy access for maintenance and water collection while keeping it out of sight.
Steps for creating a hidden rain barrel:
– Select a strategic hiding location
– Use creative landscaping for camouflage
– Maintain accessibility for easy use
– Enjoy the benefits of rainwater harvesting discreetly
This option enables you to practice sustainability while enhancing your garden’s overall aesthetic.
Difficulty Rating & Requirements
Overall Difficulty Rating: Easy
Rain barrel installation is rated as easy, making it perfect for beginners. If you’re new to DIY gardening projects or rainwater harvesting, fear not! With a little guidance and the right tools, you can set up your own rain barrel system without needing extensive experience. This project can be tackled by anyone willing to learn and follow simple steps.
Time Estimate:
⏱ Estimated time: 2-4 hours
– Planning and gathering materials: 1 hour
– Installing the rain barrel: 1-2 hours
– Testing the system and making adjustments: 30 minutes
Depending on your chosen design and setup, the time required may vary, but most installations can be completed in a single afternoon.
Skill Requirements:
– Required skills: Basic hand tools usage, measuring, and cutting.
– Beginner-friendly: Yes, absolutely! You don’t need prior experience to install a rain barrel.
– Skills that can be learned: You’ll learn to measure accurately, cut materials, and possibly even basic plumbing if you choose a more complex setup.
That said, while basic skills can be learned during the project, some advanced techniques may require more know-how or experience.
Tools & Materials Needed:
🧰 Essential items checklist
– Rain barrel: Required
– Drill and drill bits: Required
– Hacksaw or pipe cutter: Required
– Downspout diverter: Optional (for simple setups)
– Garden hose: Optional (for extending reach)
– Measuring tape: Required
– Level: Required
– Rubber washers: Required
These items will help you complete your project smoothly. Optional materials enhance functionality but aren’t necessary for a basic installation.
Step-by-Step Overview:
1. Planning and Preparation (1 hour):
Measure your space and determine where to place your rain barrel. Plan how it will connect to your downspout.
2. Installation (1-2 hours):
Cut your downspout and install a diverter (if using). Connect the rain barrel to the downspout. Ensure all fittings are secure and watertight.
3. Testing (30 minutes):
After installation, test the system during a rain event. Check for leaks and ensure proper water flow into the barrel. Adjust as necessary.
Professional vs DIY: Rough cost comparison
Hiring a professional can cost anywhere from $150 to $500, depending on the complexity of the installation. However, you can do it yourself for around $50 to $100 for materials. If you enjoy DIY gardening projects, this is an excellent opportunity to save money and learn a valuable skill. If you’re uncertain or prefer a more elaborate setup, hiring a professional may be the way to go.
This assessment gives you a clear view of what to expect when installing a rain barrel. With the right mindset and tools, this rewarding project can enhance your garden while contributing to eco-friendly gardening practices. Happy gardening!
8. Multi-Barrel Setup

For serious gardeners, a multi-barrel setup can significantly increase rainwater storage capacity. This method is ideal for larger garden spaces and provides ample water for your plants.
Plan the layout of your barrels, considering both accessibility and visual appeal. Connect the barrels using hoses or pipes to allow water to flow from one to another. Incorporate an overflow system to manage excess water safely.
Key aspects of a multi-barrel setup:
– Design an efficient layout for your barrels
– Connect them for optimal water flow
– Include an overflow system for safety
– Capture significant rainwater for dry periods
This strategy maximizes your rainwater harvesting efforts while enhancing your gardening experience.
9. Rain Barrel with a Tipping Feature

A rain barrel with a tipping feature simplifies watering your plants, making it easier and more efficient. This design allows the barrel to tip slightly when filling, ensuring maximum water collection and easy access.
Choose a barrel that pivots or one with a hinged top for this feature. As rainwater fills the barrel, it can tip to direct outflow to your watering can or hose. This design is particularly user-friendly for novice gardeners.
Steps for setting up a rain barrel with a tipping feature:
– Select a barrel with a pivot or hinge
– Ensure it tips securely for safe use
– Maximize water collection during rain
– Make it easy to access water when needed
This clever addition enhances the functionality of your rain barrel, making gardening more enjoyable.
10. Rain Barrel Hooked to a Drip Irrigation System

Integrating your rain barrel with a drip irrigation system creates an efficient and sustainable solution for watering your garden. This setup ensures that your plants receive just the right amount of water without any waste.
Connect your rain barrel to a drip irrigation system using a hose, following proper pressure guidelines for installation. This configuration maximizes water collection and directs it exactly where it’s needed, reducing evaporation and runoff. You can even set a timer for automatic watering based on your garden’s needs.
Steps for connecting a rain barrel to a drip system:
– Connect the barrel to your drip irrigation setup
– Ensure correct pressure for optimal performance
– Set a timer for automated watering
– Enjoy reduced water bills and a healthier garden
This combination makes caring for your plants easier and more eco-friendly.
Fun fact: Hooking a rain barrel to a drip irrigation system can cut outdoor water waste dramatically. With a timer and proper pressure, you water only what plants need—no runoff, no guesswork. It’s one of the smarter rain barrel installation ideas for busy gardens.
11. Rain Barrel in a Community Garden

Installing a rain barrel in a community garden promotes eco-friendly practices and provides a shared resource for all gardeners. This initiative encourages collaboration and education among community members.
Engage fellow gardeners during the installation process, sharing knowledge about rainwater harvesting techniques. Position the rain barrel in a central location for easy access by everyone. Consider hosting workshops to teach the benefits and skills related to rainwater collection.
Essential elements of a community rain barrel:
– Involve community members in the setup
– Choose a visible location for accessibility
– Organize educational workshops on harvesting
– Foster shared responsibility for maintenance
This collaborative effort not only strengthens community bonds but also promotes sustainable gardening practices.
12. Portable Rain Barrel

For urban gardeners needing flexibility, a portable rain barrel is an excellent solution. Its lightweight design allows you to move it around your garden as needed, maximizing your rainwater collection potential.
Select a barrel made from lightweight plastic for easy transport. You can position it under different downspouts based on rainfall patterns, ensuring you capture as much water as possible. Use it to water specific sections of your garden without relying solely on fixed installations.
Key features of a portable rain barrel:
– Choose a lightweight design for easy movement
– Position it based on rainfall for maximum collection
– Use it flexibly for targeted watering
– Promote eco-friendly practices in your gardening routine
This portable solution allows you to adapt to your gardening needs without being confined to one spot.
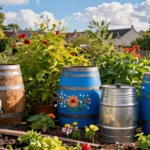
13. Creative Upcycled Rain Barrel

Unleash your creativity by upcycling old containers or furniture into a rain barrel. This approach not only saves money but also infuses a unique, personal touch into your garden.
Look for old bathtubs, barrels, or large buckets that can easily be transformed into functional rainwater collectors. Add your personal flair by decorating the upcycled barrel with paint or plants, turning it into a beautiful art piece. Repurposing materials reduces waste and encourages sustainable gardening practices.
Steps for creating a creative upcycled rain barrel:
– Identify suitable containers for upcycling
– Decorate to reflect your personal style
– Ensure proper sealing for water collection
– Combine functionality with artistic expression
This approach allows you to showcase your creativity while contributing to a sustainable gardening effort.
Conclusion

With these 13 easy rain barrel installation ideas, you’re now equipped to embark on your rainwater harvesting journey. Each idea is designed to inspire creativity and sustainability in your urban garden. From decorative options to practical setups, there’s a rain barrel solution for everyone. Start collecting rainwater today to support your gardening efforts and contribute to a greener planet. Let your garden thrive and make a positive impact on the environment!
Note: We aim to provide accurate product links, but some may occasionally expire or become unavailable. If this happens, please search directly on Amazon for the product or a suitable alternative.
This post contains Amazon affiliate links, meaning we may earn a small commission if you purchase through our links, at no extra cost to you.
Frequently Asked Questions
What are the simplest rain barrel installation ideas for beginners?
Getting started with rain barrel installation is easier than you think. Start with a barrel that fits your space and a spot directly under a downspout for quick setup. Attach a simple downspout diverter to guide roof runoff into the barrel, then add a lid and a fine mesh screen to keep debris and pests out. Install a spare overflow hose so excess rainwater can drain safely away from your foundation. For beginners, a basic first-flush or screen filter helps improve water quality without complicating the setup. When ready, hook up a hose or garden hose connector for easy watering. This approach is perfect for rainwater harvesting projects on a budget and a great entry into eco-friendly gardening and beginner gardening tips.
How can I install rain barrels with minimal tools and no advanced plumbing?
Many rain barrel setups are surprisingly tool-light. Choose a barrel with a built-in spigot and a universal downspout adapter. Cut the downspout just enough to attach the adapter, then use a flexible hose to connect the spigot to your barrel. No soldering or complex plumbing is required; just snug fittings, sealant if needed, and a sturdy base. Add a simple screen and lid, and place the overflow hose to direct extra water away from foundations. This DIY approach keeps costs down and makes DIY gardening projects accessible for beginner gardening tips while still delivering efficient rainwater harvesting and sustainable water solutions.
What common mistakes should I avoid with rain barrel installation in urban spaces?
Urban setups are great, but watch for placement and drainage. Don’t place barrels where overflow can pool near foundations or under trees where debris can clog the screen. Skipping a proper lid or screen invites mosquitoes and pests. Forgetting to install an overflow or directing it toward walls or sidewalks can cause water damage. Not securing the barrel to resist tipping in storms is another risk. Finally, ignore local codes or regulations—check your municipality before installing to ensure compliance and smooth operation of your rainwater harvesting system.
Can rain barrel installation ideas work for small balconies or rooftops?
Absolutely. For compact spaces, choose slimline or stackable barrels that fit a balcony edge or rooftop setup. Use railing-mounted stands or vertical supports to save space, and opt for a balcony-downspout adapter to feed the barrel. A short run of gutter tubing can feed a planter or a small drip irrigation line on a container garden. With thoughtful placement, you can still enjoy eco-friendly gardening and sustainable water solutions through urban rainwater harvesting.
What maintenance tips help rain barrel systems stay functional year-round?
Keep filters and screens clean by inspecting them monthly, and test the overflow during a rain event to ensure it drains properly. In cold climates, drain and store hoses to prevent freezing, or use a winter cover. Rinse the barrel occasionally to prevent sediment buildup, and consider a simple first-flush diverter to improve water quality. Secure lids to deter pests, and regularly check fittings for leaks. With these routine checks, your rain barrel installation ideas stay reliable for ongoing rainwater harvesting and sustainable water solutions in your garden.
![9 Essential Compost Bin Maintenance Tips [No Bad Smells]](https://huserie.com/wp-content/uploads/2026/04/9-Essential-Compost-Bin-Maintenance-Tips-No-Bad-Smells-150x150.webp)
![15 Stunning Inflatable Pool Deck Ideas [Make It Look Built In]](https://huserie.com/wp-content/uploads/2026/04/15-Stunning-Inflatable-Pool-Deck-Ideas-Make-It-Look-Built-In-150x150.webp)