Patios are perfect for relaxation and gatherings, but chilly evenings can put a damper on your outdoor fun. With autumn in full swing, you might be craving the warmth that only a patio heater can provide. That’s why I put together this post—because no one wants to huddle under a blanket while everyone else enjoys the crisp air.
If you’re passionate about outdoor living or simply want to extend your backyard enjoyment, this guide is for you. You’ll discover how to set up your patio heater safely and effectively, ensuring you can enjoy those cozy nights with family and friends. I’ve compiled some essential patio heater setup tips that are straightforward, practical, and perfect for anyone looking to enhance their outdoor space without any worry.
By the end of this article, you’ll have a solid understanding of how to install your patio heater safely. From choosing the right location to ensuring regular maintenance, these tips will help you create a warm and welcoming atmosphere in your backyard. Let’s dive into these easy steps to guarantee both comfort and safety as you enjoy your outdoor heating experience.
Key Takeaways
– Choose the Right Location: Position your heater in an area that is both safe and effective for heating your space. Avoid spots near flammable materials or enclosed spaces.
– Follow Manufacturer Instructions: Always adhere to the guidelines provided by the manufacturer. This ensures proper setup and safe operation of your heater.
– Secure the Base: Make sure your patio heater has a stable base. This prevents tipping over, especially on windy days, ensuring safety for everyone around.
– Check for Gas Leaks: If you’re using a gas heater, regularly inspect for leaks. A simple soap solution can help identify any gas escaping from connections.
– Regular Maintenance is Key: Keep your patio heater in top shape with routine maintenance. Cleaning and checking components will ensure it operates safely and efficiently for many seasons.
1. Choose the Right Location

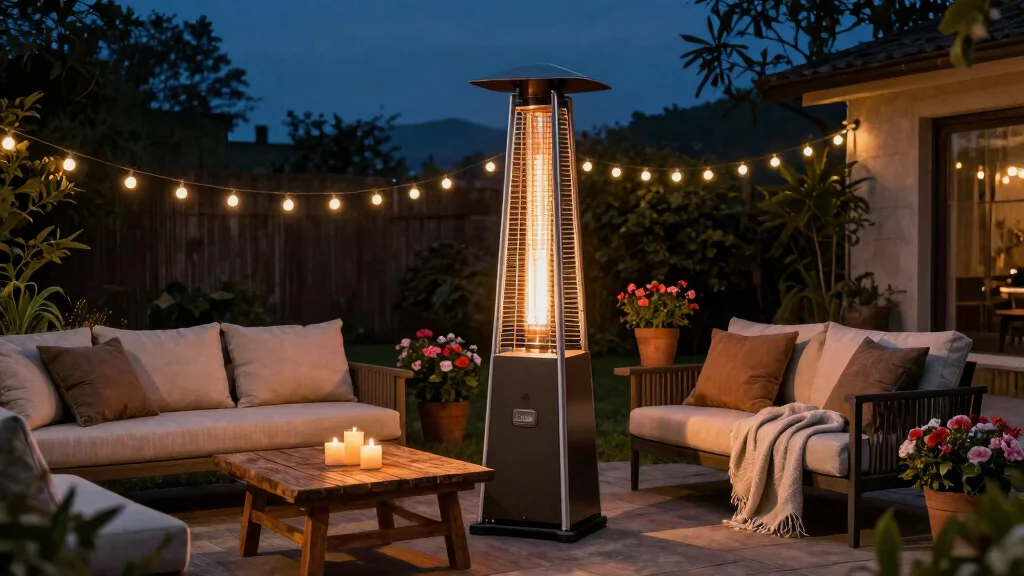
Finding the perfect spot for your patio heater is essential for creating a warm and inviting outdoor area. A well-chosen location enhances heat distribution while ensuring safety from flammable materials. Aim for an open space that allows heat to circulate freely, avoiding corners that can trap warm air. For instance, placing your heater near the seating area, but not too close to the house or overhanging branches, allows for maximum warmth without risk.
Consider the wind direction when selecting your heater’s placement. Positioning it to shield from strong gusts can significantly improve heating efficiency. Always maintain a safe distance from walls and furniture to ensure a safe and enjoyable experience.
Here are some tips to optimize your heater’s location:
– Position the heater at least three feet away from walls
– Choose a location away from overhanging branches
– Ensure the heater is not obstructed by furniture
By carefully selecting your heater’s location, you create a welcoming atmosphere that keeps everyone cozy and safe as they gather outside.
Fun fact: Proper patio heater setup tips include keeping at least 3 feet from walls and combustible material. Positioning near seating boosts perceived warmth by up to 20%, while avoiding corners keeps heat circulating safely. Measure and test airflow for optimal comfort.
2. Follow Manufacturer Instructions

Adhering to the manufacturer’s guidelines is crucial for a successful patio heater setup. Each heater comes with specific instructions that ensure proper assembly and safety. Take the time to read the manual thoroughly to familiarize yourself with the components and tools needed for installation.
Before starting, verify that all parts are present and undamaged. Gathering necessary tools beforehand helps avoid interruptions. If protective gear is recommended, ensure you wear it to prioritize safety during the installation process.
Pay attention to any clearances or safety distances specified by the manufacturer:
– Read and understand the installation manual
– Double-check that all parts are complete and functional
– Follow clearance guidelines to prevent hazards
By following these guidelines, you ensure a safe and efficient setup, allowing you to enjoy your heater worry-free.
Relatable: Keeping my patio warm is great, but I learned the hard way: follow the manufacturer instructions first. Read the manual, verify parts, gather the right tools, and wear protective gear—these small steps are the real patio heater setup tips that keep you safe and comfy.
3. Secure the Base

A stable base is vital for your patio heater’s safety and functionality. Ensuring the heater is secure prevents it from tipping over, especially in windy conditions. Most heaters come with a weighted base, so make sure it is properly secured. If possible, place it on a sturdy mat or platform to enhance stability.
In areas prone to wind, consider using additional weights or sandbags for added security. A protective cover can also safeguard your heater when not in use, prolonging its life and maintaining stability.
Here are effective ways to secure your heater:
– Use a weighted base to prevent tipping
– Place it on a stable mat for extra support
– Add sandbags in windy areas for stability
By ensuring a well-secured patio heater, you can enjoy your outdoor space with peace of mind, knowing safety is prioritized.
4. Maintain Proper Clearance

Maintaining proper clearance around your patio heater is essential for safety. It’s crucial to keep flammable materials at a safe distance to prevent fire hazards. Establish a safety zone of at least three feet from walls, furniture, and vegetation to allow for unobstructed heat flow.
Regularly inspect your surroundings for any items that may encroach upon this safety zone, especially after gatherings. This proactive approach helps mitigate risks. Also, adhere to the clearance specifications provided in your heater’s manual, as these can vary by model.
Consider these clearance tips:
– Keep a minimum of three feet from all objects
– Regularly check for encroaching items
– Follow manual specifications for safe distances
By ensuring proper clearance, you create a safe environment that enhances your outdoor heating experience.
Did you know keeping at least three feet of clearance around your patio heater dramatically lowers fire risk? After gatherings, quickly scan for items creeping into the zone—cards, cushions, planters—and adjust before you light up. Your patio heater setup tips help keep everyone safe.
5. Check for Gas Leaks

For gas patio heaters, checking for leaks is a vital safety measure before each use. Start by inspecting hoses for wear or damage. A simple mixture of soap and water can help identify leaks; apply it to connections and hoses, looking for bubbles that indicate escaping gas.
If you detect a leak, turn off the gas supply immediately and consider seeking professional help. Regular maintenance ensures your heater operates safely and efficiently. Always store the gas cylinder away from direct sunlight or heat, as extreme temperatures can impact performance.
Follow these steps for leak checks:
– Inspect hoses for wear or damage
– Apply soapy water to check for bubbles
– Store gas cylinders in shaded areas
Making leak checks part of your routine guarantees a worry-free and safe outdoor heating experience.
6. Utilize Safety Features

Modern patio heaters are equipped with various safety features that enhance outdoor heating safety. Familiarize yourself with these elements, such as automatic shut-off valves and tilt sensors that deactivate the heater if it tips over. These features play a crucial role in preventing accidents and fires.
Before use, ensure all safety features are functioning correctly. If your heater has a protective screen, make sure it is in place to prevent unintended contact with the heating element. Regularly testing these features ensures they work as intended.
Maximize your heater’s safety with these actions:
– Check automatic shut-off functions before use
– Ensure tilt sensors are operational
– Keep protective screens in place
With the right safety measures, you can enjoy cozy evenings outside, confident that you’ve taken precautions to protect your loved ones.
How To Install Your Patio Heater
Tools You’ll Need:
– Screwdriver
– Adjustable wrench
– Level
– Tape measure
– Safety goggles
– Gloves
– Gas leak detection solution (soapy water)
Step 1: Measure & Prep
✔ Measure the area where you want to place your patio heater. Make sure to leave enough space around it for safety and airflow. A good rule is to have at least 3 feet of clearance from walls and furniture. Ensure the spot is level to avoid any tipping hazards. If needed, clear any debris from the area.
Step 2: Assemble the Heater
✔ Follow the manufacturer’s instructions to assemble the heater. This usually involves attaching the base, pole, and head of the heater. Use the screwdriver to tighten the screws securely. Make sure all parts are fitted snugly to prevent wobbling when in use.
Step 3: Secure the Base
✔ Ensure the base of the heater is stable. If your heater has a weighted base or requires sand or water, fill it as per the instructions. This is crucial for preventing accidental tipping. You can also use brackets or anchors if you place it on a deck or patio.
Step 4: Connect the Gas Source
✔ If you have a gas heater, carefully connect it to the gas source. Use an adjustable wrench to ensure a snug fit. Check the connection for leaks by applying the gas leak detection solution. Look for bubbles, which indicate a leak. If you spot any, tighten the connection or replace the hose if needed.
Step 5: Check Clearances
✔ Double-check that your heater is at least 3 feet away from any combustibles, including furniture, walls, and overhanging objects. This is essential for safe patio heater use. If your patio is covered, ensure the height clearance is sufficient to prevent accidents.
Step 6: Test & Enjoy
✔ Turn on the heater according to the manufacturer’s instructions. Allow it to burn for a few minutes and monitor it for any issues. Make sure you are safely distanced during this initial test. Enjoy your newly heated outdoor space!
⏱ Time: ~1-2 hours | 💡 Tip: Having a friend help you can make the installation smoother and quicker! Make sure to always follow safety guidelines for the best experience with your patio heater.
7. Regular Maintenance is Key

To ensure your patio heater operates safely and efficiently, regular maintenance is essential. This involves cleaning the unit and checking for signs of wear and tear. Dust and debris can accumulate, affecting performance and increasing fire risks, so make it a habit to clean before and after the season.
Inspect gas connections, burners, and hoses for any damage or corrosion. Replace any defective parts as needed. Additionally, consider storing your heater indoors during harsh weather to extend its lifespan. Regular checks not only guarantee safety but also enhance efficiency.
Incorporate these maintenance practices:
– Clean the heater before and after use
– Inspect all components for damage
– Store indoors during bad weather
By embracing a maintenance routine, you ensure every gathering is warm and enjoyable, enhancing your outdoor living experience.
Conclusion

Implementing these patio heater setup tips will transform your outdoor space into a cozy haven, ensuring safe and enjoyable use throughout the chilly months. With careful planning, regular maintenance, and a focus on safety, you can create memorable moments outdoors with family and friends. Embrace the warmth and enjoy the beauty of your garden, no matter the season!
Note: We aim to provide accurate product links, but some may occasionally expire or become unavailable. If this happens, please search directly on Amazon for the product or a suitable alternative.
This post contains Amazon affiliate links, meaning we may earn a small commission if you purchase through our links, at no extra cost to you.
Frequently Asked Questions
What are the essential steps for proper patio heater setup tips to ensure safe operation on small patios?
To follow patio heater setup tips for safe operation, start with placement: choose a stable, level surface and keep at least 3 feet from walls, furniture, and overhangs.
Check wind exposure and avoid use in strong gusts; use a wind screen if appropriate, but never block the flame.
Then pick the right fuel or power source and follow the manufacturer’s ignition and flame control instructions. For propane, ensure the tank is upright, the regulator hose is intact, and test for leaks with a soapy solution. For electric, use a grounded, weather-rated outlet and avoid extension cords.
Finally, create a safe zone: remove combustibles nearby, use a heat shield if recommended, and store the heater in a dry place when not in use.
How can I maximize efficient outdoor heating in a small space while keeping patio heater safety and safe patio heater use?
To maximize efficient outdoor heating in a small space, start with a compact unit suited for the area. Position the heater to face the seating zone, with a clear line of sight and at least 3 feet from walls or furniture, and use a reflector to bounce heat toward people. Add a wind shield or place the heater under a sheltered spot to cut heat loss from gusts, but never block the flame. Use weather-rated cords and built-in timers or smart controls to run only when you’re outside. Pair with other backyard heating solutions, like a sheltered seating nook, to reduce how long you need the heater on.
What maintenance and inspection routines should I follow to maintain outdoor heating equipment and ensure patio heater safety?
Regular maintenance keeps patio heater safety and performance high. Weekly checks: inspect for loose screws, corrosion, and clear vents; wipe away dust and debris. For propane models, test the hose and connections for leaks with a soap solution before each use and replace damaged hoses immediately. For electric models, inspect the power cord and plug for wear or scorch marks. Keep vents clear and clean around the base. At season end, turn off fuel or unplug, and store propane tanks in a cool, ventilated area. If you notice odd smells, sputtering, or irregular flames, stop using the heater and have it serviced.
What common mistakes should be avoided when installing patio heaters in small spaces to ensure backyard heating solutions are safe and effective?
Avoid these pitfalls: 1) placing the heater too close to walls, furniture, or overhangs; maintain at least 3 feet of clearance. 2) letting flammable fabrics or materials get within reach of the flame. 3) using the heater in windy conditions or without any heat protection. 4) running extension cords or using unsuitable power sources for electric models. 5) not securing a propane cylinder or checking for leaks. 6) using an uneven surface or building a cluttered seating area around the unit. 7) ignoring manufacturer instructions or local codes. Instead, rearrange seating, add a simple windbreak, or consider wall- or ceiling-mounted options for safer, more efficient heating.
Are there quick tips to install a heater safely without professional help, focusing on patio heater setup tips for beginners?
Yes. Here are beginner-friendly steps: 1) read the manual and pick a unit sized for your space. 2) choose a location with proper clearance from combustibles and overheads. 3) for propane, ensure the tank is upright, connections are tight, and test for leaks with a soap solution. 4) for electric, plug into a weather-rated, GFCI-protected outlet; avoid using extension cords. 5) verify the surface is stable and that nothing can be knocked over. 6) test ignition in a safe, open area and adjust flame settings as needed. 7) use a timer or smart switch to control run time and save energy. 8) keep kids and pets at a safe distance and store the heater properly when not in use. If you’re unsure about gas lines or complex installations, don’t hesitate to contact a professional.
![9 Essential Compost Bin Maintenance Tips [No Bad Smells]](https://huserie.com/wp-content/uploads/2026/04/9-Essential-Compost-Bin-Maintenance-Tips-No-Bad-Smells-150x150.webp)


![15 Stunning Inflatable Pool Deck Ideas [Make It Look Built In]](https://huserie.com/wp-content/uploads/2026/04/15-Stunning-Inflatable-Pool-Deck-Ideas-Make-It-Look-Built-In-150x150.webp)